Montessori Cursive Alphabet Cards

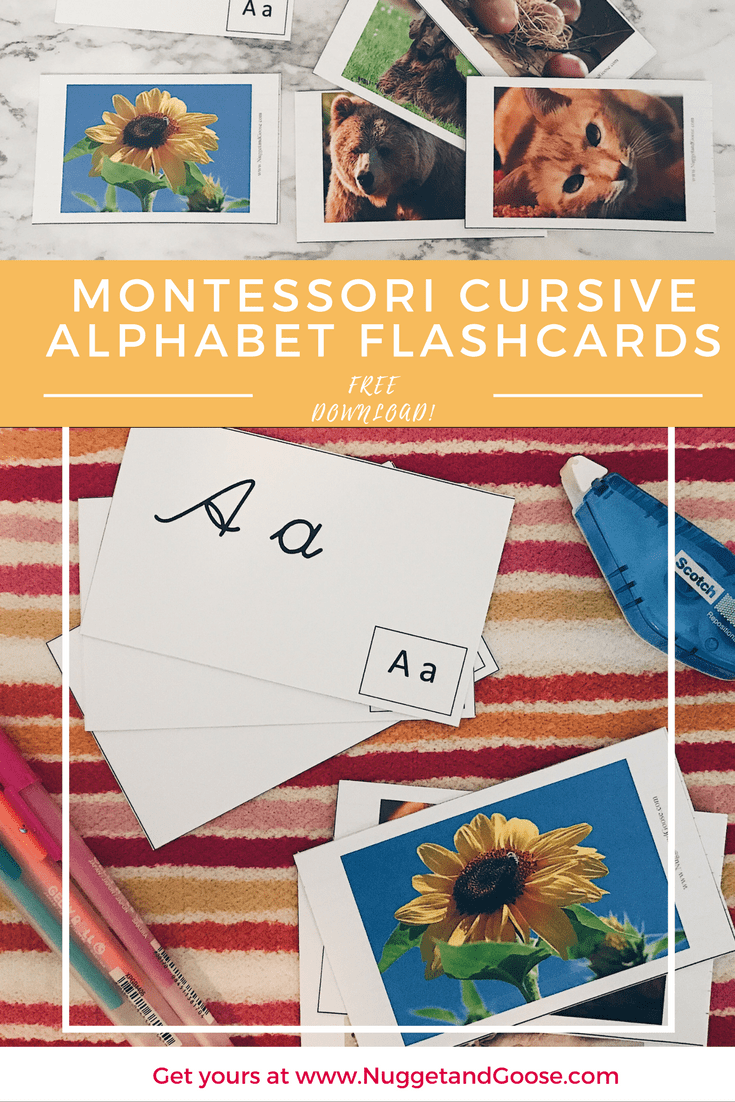
Montessori Cursive Alphabet Flashcards for Preschool Tot School Children - free printable download available at www.NuggetandGoose.com

Free Download! Montessori Cursive Alphabet Flashcards

A key component of Montessori primary education is that children learn to write in cursive first. I was initially surprised by this since traditional education teaches cursive writing later (if ever!). However once the philosophy behind it was explained, it made perfect sense. If you look at a young child’s scribbles, they usually consist of loops and wavy lines. Their writing flows from one shape to the next without lifting their pencil. Sound familiar?

Pre-writing naturally tends to mimic cursive. This is why the Montessori philosophy teaches cursive first – they believe it comes easier to young children.

Unfortunately I have found that cursive writing materials for preschool aged children are remarkably difficult to find. Most workbooks for this age group focus on printing letters. The few Montessori-endorsed materials I found were often very expensive and had to be ordered online.

When I brought this up with Goose’s teacher she helped me to devise a flashcard system that I could make on my own. After taking the time to create these fabulous flashcards, I just had to share them with you!

I designed my flashcards to fit on standard 3″ x 5″ note cards. Every flashcard features a front with  an upper and lower case cursive letter, along with a small inset script letter. On the reverse is a large high resolution photograph of an animal or object that begins with that letter. I have even included an additional blank template in case you wish to replace an image with one of your own. It turned out to be much harder than I expected to come up with what I hoped would be a universally recognizable image for each letter. The last thing I wanted was for children to get confused because they saw ‘yak’ and thought ‘cow’ or saw a ‘yacht’ and thought ‘boat’. (So I went with Yogurt for Y which probably isn’t much better, but it is what it is.)

How to Assemble Your Flashcards

These free flashcards are the perfect way to help your child learn the cursive alphabet through the Montessori Method.

Assembly is very simple for these cards. Simply download and print the flashcards, cut out each card (It will go much faster with a paper cutter like this one from Swingline.) Then use a tape runner to adhere the front and back to a 3×5 notecard. If you wish to make your flashcards even more durable you could laminate them, which is what I did after taking pictures. Laminated items really don’t photograph well for me.

Using Your Flashcards

Use these free Montessori cursive alphabet flashcards to help your child learn their cursive letters and sounds

These flashcards have both the cursive letters as well as script letters on the front. The idea is to cover the script letter with your thumb and ask your child what sound the cursive letter shown makes. If your child is struggling, move your thumb to reveal the script letters. We see these so much in our society that many children pick them up naturally. Finally, show your child the object or animal on the back of the card so they link the ‘buh’ sound of the letter B with ‘bear’ etc. It may be helpful to note that in Montessori schools children do not initially learn the names of letters, they are called by the sound they make.

You can also use the flashcards in reverse by showing your child the picture first. Have him name the sound that the image starts with and then turn over the card to reveal the letters that make that sound.

OK, I’m sold. How do I get mine?

This is the best part – the flashcards are free! All you have to do is sign up below. You will then receive a link and password to my Free Digital Resource Library. You will never get spam from me but you WILL get access to an ever-growing library of printables, templates and more. What are you waiting for?

Save

Save

Save

Save

Farm Themed Tot School: Part III

This fun and educational farm themed tot school unit is full of free downloads, fun crafts and montessori-inspired activities. Visit www.NuggetandGoose.com to learn more!

It’s Friday, and that means the end of another fantastic week of Tot School. This is the final post of my Farm themed tot school unit. If you missed the first 2 parts, you can find them here, and here.

“Feed The Chickens” Tot Tray

This Montessori Inspired Spooning activity is an excellent way to develop fine motor skills in preschoolers with a farm themed tot school twist!

This is a fantastic Montessori-based activity that focuses on spooning. Spooning is a fantastic way to develop hand strength and muscle control which is vital when children begin learning to write. To present this activity I placed a tray on our learning center with 3 small ceramic ramekins, one larger ceramic ramekin, and a spoon. Inside the larger ramekin I poured about 1/2 Cup dried split peas. The 3 smaller ramekins each contained a chicken figurine from our Battat Farm Animal Set.

I then demonstrated for goose how to carefully scoop up one spoonful of peas and pour it into a ramekin. He up the necessary motions quickly and was soon rotating out his chickens so that all of our farm animals could be fed.

This Montessori Inspired Spooning activity is an excellent way to develop fine motor skills in preschoolers with a farm themed tot school twist!

It’s important to note that no matter how careful your child is, you will ultimately end up with peas on your floor. However, presenting this activity on a tray does help keep the mess contained.

Animal Sorting Activity

Allow your child to sort a variety of farm animals with this fun and educational farm tot school or preschool activity.

I came up with the idea for this activity when I noticed that Nugget was having a hard time distinguishing between the animals in our Battat Farm Animal Set. This set contains 60 figures, 5 of each species. Unfortunately, unlike Safari Ltd. Toob figures, these have less detail and very similar coloring. To be honest, there are times when I have to take a closer look to determine what animal I’m looking at. Instead of being frustrated I decided to use the similarities to help develop visual discrimination skills.

Free Farm Animal Alphabet Clip Card Download for Tot School or Preschool learning activities

I purchased these wooden trays several years ago at Target, but this one is very similar. Inside each tray I adhered a set of 4 Velcro tabs. The opposite side of the Velcro tabs was attached to a laminated image of each type of animal. This provided a great deal of variety in the sorting, because I could group up to 4 types of animal within each ‘fence’.

Once the activity was prepared, I gave a lesson to both Nugget and Goose. I showed them how to sort through the animals to find the ones that match the picture within each tray. For Nugget, I kept the activity very simple. I began with only a single, easily identifiable animal in each pen. Then I gradually increased the difficulty.

This sorting game is perfect for any farm themed tot school or preschool learning unit.

For Goose, I focused on the animals that looked the most alike. Then I encouraged him to carefully examine the animals to find characteristics that make them easier to identify. I.e. the goat and the dog figures are very similar so I helped him check for horns to tell the two apart.

Farm Animal Alphabet Clip Cards

Download these free farm animal alphabet clip cards for your next preschool or tot school farm unit.

I designed this set of clip cards to help children begin to recognize the sound that words start with, and then associate that sound with the corresponding letter. We love to play “the sound game” with Goose when we’re driving in the car. I pick an object and ask him to tell me what sound it starts with. Then we take turns trying to think of other words that start with the same sound. This is particularly great because I often come up with words that Goose isn’t familiar with so he is building vocabulary as I explain what the words mean.

Free Farm Animal Alphabet Clip Card Download for Tot School or Preschool learning activities

The sound game can easily be adjusted to accommodate older children. Ask them to identify the sound that a word ends with or even a middle sound. As children become more accustomed to this game, you can begin to introduce clip cards like these. The idea is for the child to name the animal shown, then identify the sound that it starts with. Finally, have them point out the letter that makes that sound. They are called ‘clip cards’ because parents often have the child use a clip or clothespin to mark their letter selection.

I like to present the cards on a metal tray or cookie sheet along with a set of small magnets. (As always, keep small magnets away from young children for whom they could present a choking hazard.) To get your free set of printable clip cards sign up below. You will receive your link and access code for my Free Digital Resource Library. Hint: There’s a lot more there than just clip cards!

Download these free farm animal alphabet clip cards for your next preschool or tot school farm unit.

What do you think? Did you enjoy this week’s farm unit? Let me know how it went, and what unit themes you would like to see next in the comments below.


Save

Save

Save

Farm Themed Tot School: Part II

This is Part 2 of our Farm Themed Tot School Unit which features Rooster Crafts, Free Printable Counting Mats, DIY Paper Bird Nests and More!

We are rolling right on through our farm themed tot school unit, and so far we have been having a blast! If you missed Part I, be sure to check it out. There were some really great crafts, recipes and activities for preschool or tot school. Today, our farm unit is going to the birds – literally! All of our crafts and activities revolve around poultry, so we will be feeding poultry, gathering eggs, gluing feathers and much more. Let’s get started!

Feed the Chickens Counting Mats

These adorable counting mats will help your child develop math and fine motor skills as part of your farm themed tot school unit.

I think counting mats are such a fun way to combine fine motor skill development with early math skills. Plus, they make counting just a little more fun. I designed these mats for counting up to 20, although you could easily use only the first 10 to match your child’s skill level. On each card I have featured one or more bird from the farm, and these birds are hungry! I recommend using dry corn kernels but you can use any dry beans or small counter that you have at home. As always, any small object (such as corn kernels) can post a choking hazard  to small children so use your own best judgement.

While Goose enjoyed working his way through all 20 counting mats, Nugget had fun helping by trying to name what type of birds were on each card. It’s always great when a learning activity can include both an older and younger sibling!

Visit my Digital Resource Library to download and print your free copy of my Feed the Chickens Counting Mats. Don’t have an access code? Easy! Just sign up below and one will be emailed to you right away!

Fruit & Veggie Search Sensory Bin

Fruit and Vegetable Search Sensory Bin

I wish I could take credit for this activity but all the credit for this one goes to Kim at Life Over C’s. Definitely check out her site for some fantastic learning activities and to download the printables for this fun activity.

This activity features a printable mat showing a wide assortment of fruits and veggies, along with a matching set of fruit and veggie cards. A quick pass through the laminator and a few Velcro tabs later and you have a fun and educational sensory bin search! I used Popsicle sticks and card stock to make garden signs that I adhered inside our sensory bin with a hot glue gun. This was definitely one of our cuter activities, and digging through the beans to find each fruit or vegetable kept Goose occupied for quite a while.

Fantastic black bean sensory bin with a fruit and vegetable search game. Perfect for farm or garden tot school!

When we began I figured this would be one of those short-lived activities that wasn’t challenging enough for Goose but was a bit advanced for Nugget, boy was I wrong! It turns out that Goose’s fruit and veggie vocabulary isn’t quite as advanced as I thought and he learned a lot as he dug out each card and then let Nugget help him find the match.

Of course, soon the tractor was digging out the vegetables, and I had to watch Nugget like a hawk to be sure he didn’t try to eat the black beans, but overall I would call this one a win!

Decorate Your Own Rooster Craft

This free download features a simple rooster design for coloring or making a fun rooster craft. Perfect for any preschool or tot school Farm themed learning activity. Visit www.NuggetandGoose.com to get yours!

For this project we decided to create our own pet roosters! Goose named his ‘Captain Picklepuss’, which is of course a very respectable name for a rooster. We decorated our roosters using glue, feathers, crayons, and pretty much anything else Goose dug out of our craft closet. The end result was a rooster that would be the talk of any barnyard, I’m sure.

This free download features a simple rooster design for coloring or making a fun rooster craft. Perfect for any preschool or tot school Farm themed learning activity. Visit www.NuggetandGoose.com to get yours! Download this free rooster printable to make a fun rooster craft or coloring page. It's perfect for any preschool or tot school farm learning unit.

Visit my Digital Resource Library to download and print your free Rooster Printable. Don’t have an access code? Easy! Just sign up below and one will be emailed to you right away!


Egg Gathering Imaginative Play

Learn how to DIY your own paper bag bird's nests with this fun and easy egg gathering imaginative play/ tot school activity.

My boys have very active imaginations and adore pretend play. I think that the creative thinking skills developed during imaginative play are vital to future success, so we put a lot of emphasis on it in our house. When shopping for toys I always avoid what Alton Brown calls ‘Unitaskers’. These toys that can only be played with in one specific way just seem limiting and are rarely the toys that see repeated play.

For this activity I made nests out of paper bags (instructions below) and then filled each nest with a few plastic Easter eggs. We were a little short on stuffed chickens so our nests included a variety of feathered occupants. After staging the nests, I also laid out a cowboy hat for costuming, and an egg carton for additional sorting practice. I gave each boy a basket and encouraged them to gather eggs and just have fun. Not surprisingly, Nugget decided to fill his basket with poultry and lovingly carry them throughout the house, carefully clucking and quacking at each one. This is such a sweet age! Goose took the task a little more seriously and was very intent on gathering all of the eggs, and opening each one in search of leftover Easter candy. As if candy would last that long in our house!

They returned to this activity several times this week, and each time they found new ways to interact with the nests. My favorite was when I walked into the room to find Nugget sitting very carefully on a plastic egg. Evidently his brother told him if he sat still long enough it would hatch! Oh how I hated to burst that bubble!

This egg gathering imaginative play is perfect for any farm themed tot school or preschool unit. Learn how to DIY your own paper bag bird's nests too!

Supplies:

  • Several Brown Paper Lunch Bags
  • Scissors
  • Glue
  • Plastic eggs

Learn how to DIY your own paper bag bird's nests with this fun and easy egg gathering imaginative play/ tot school activity.

Instructions:

  1. Begin by cutting off the top 2/3 of your lunch bags. You will need 2 bags per nest. (Don’t throw away the tops – I will be showing you next week how to use them for a fun craft!)
  2. Cut thin slices from the open edge of your bag down to the fold (see images). Don’t worry about making it perfect, messy is great for this project!
  3. Open your bag and then crinkle it in to a ball. The wrinklier the better!
  4. Repeat steps 1-3 on your second lunch bag, then open both wrinkled bags.
  5. Place one bag inside the other and using a rolling / scrunching motion to create a nest shape.
  6. Fill with plastic eggs, candy, or whatever else your little heart desires.

Our Favorite Farm Themed Books

Check our this list of our favorite farm themed books for toddlers and preschoolers. Reading is the number one indicator of future success - grab one of these books and read it now!

We had so many farm themed books in our collection, that this was one tot school unit that hardly required a trip to the library. Here are a few of our favorites:

Dk Tractor Shaped Board Book

This is a book that I picked up a few years ago at a consignment sale, and it has been a favorite of ours ever since. It’s pretty short, but the novelty lies in the fact that it places you inside the tractor. It’s a fun short read perfect for a toddler who is just getting into tractors.


Otis by Loren Long

This is the original Otis book, although there are now several in the series. It tells the tale of a sweet tractor and his friendship with a lonely calf. The illustrations are striking and the plot is well-written enough that parents and children should both enjoy this story.


The Grumpy Morning by Pamela Duncan Edwards

This is a cute book about the morning that the farmer overslept. I like the fact that the farmer is a woman, since too many farm books only feature male farmers. It also has a nice rhythm that makes reading it aloud pleasurable.


Moo by Matthew Van Fleet
Matthew Van Fleet is famous for his beautifully photographed and highly interactive children’s books. Each page features tactile stimulation and moving parts, sure to hold even the youngest child’s attention.


Cock-a-Doodle-Doo! Barnyard Hullabaloo by Giles Andreae

Giles Andreae is back again with this tour through the barnyard. Each page features a different animal and a short rhyme. The illustrations are fun and bright and the rhymes are playful. It’s definitely worth adding to your bookshelf.


Lift the Flap Farm by Hinkler Books

This book can be a little tough to find, but it’s worth the effort. It’s chock full of photographs of farm animals, equipment and even produce. My boys love lifting the flaps, and I love the extra questions at the bottom of each page to encourage critical thinking or find hidden extras.


Pass It On! by Marilyn Sadler

This is a fun and silly story about how a message can be distorted as it gets passed from person to person (or animal to animal as it were). It’s great for an older preschooler who can understand the concept of pass it on, but the humor might be lost on younger children.


The Cow Loves Cookies by Karma Wilson

I love love love Karma Wilson. Her books never disappoint, and always include an attractive rhyming structure along with a playful plot. If you buy one fiction book from this list – buy this one. It’s just plain fun to read!


Have you enjoyed our Farm themed tot school unit so far? Comment below!

Be sure to check back later this week to see the final portion of our farm unit. Some of the best is still yet to come!

Save

Farm Themed Tot School Unit: Part I

This Farm Themed Tot School unit is full of free printable montessori nomenclature cards, a pigs in mud sensory bin, an adorable lamb paper plate craft, and a delicious recipe for easy 3-ingredient haystack snacks. Check it out at www.NuggetandGoose.com!
This fun and easy farm themed tot schol unit is a perfect way to help your preschooler learn and play!
Something about Summer just makes me think of life on the farm.

I don’t know if it’s the slower pace or the long days outside in the sun but it always is enough to make farm life appealing. At least it was until last week. Last week we signed up to have farm duty at Goose’s Montessori school. The school has it’s own miniature farm with chickens, ducks, sheep and miniature donkeys. Since there is a new baby donkey I was quick to sign up to take care of the animals for one week of summer break. Little did I know that I was going to be in WAY over my head!

In way over my head …

The first day  I showed up with a 3 year old and 1 year old thinking it would be a quick visit. We would hand out a little food, pet the baby donkey and be home in time for naps. Nope! I think the highlight was when the sheep got out of their pen and I spent an hour attempting to chase / bribe them back in. Or trying to corral the chickens into the coop …. or was it when I was hauling buckets of water (PS I think it weighed at least 50 lbs!) and a donkey knocked me over and I spilled the bucket all over myself.

Long story short – I have learned that I am NOT cut out for farm life. That hasn’t kept me from designing a super fun farm themed tot school unit. Please forgive the 3 enormous posts this week – there were so many cute activities I got a little carried away!

Nomenclature Cards

Nomenclature cards are a Montessori based method to increase your child's vocabulary. Get your free copy of farm cards at www.NuggetandGoose.com! Perfect for Tot School!

It wouldn’t be a tot school unit without nomenclature cards. If you aren’t familiar with these fantastic learning tools I explain them here. I always like to start any new unit with nomenclature cards because they are such an easy way to introduce the new vocabulary that you will be using throughout the unit. I have designed my own set of farm nomenclature cards that you can download for free from my Digital Resource Library. Don’t have an access code? Just sign up below and one will be emailed to you right away!

Visit the download page at www.NuggetandGoose.com to download these FREE Farm themed nomenclature Cards!

One of my favorite games with nomenclature cards is to combine them with one or more Safari Ltd. Toobs. I used the Farm TOOB and Farm Babies TOOB. Then allow your child to match the photographic image on the nomenclature card to the Toob figurine. For us this process often devolves into imaginative play but even then the boys are learning. It usually sounds something like, “The baby horse is driving my Hot Wheels, Mommy!” “The foal is driving the Hot Wheels dear.”

Is it just my house or does every activity ultimately involve Hot Wheels?

Pigs in Mud Sensory Bin

All it takes is pudding and imagination to bring this Pigs in Mud Sensory Bin to life! Visit www.NuggetandGoose.com to learn more!

Now this is one FUN sensory bin! Probably because it’s so messy. We used some pigs from our Farm TOOB as well as pigs from the Battat Terra Farm Animals Set , and set them loose in a tub full of chocolate pudding.

I introduced the activity with this video explaining why pigs roll in mud, and we read ‘Hogwash‘ by Karma Wilson.

Goose prefers to keep his hands clean, but even he was willing to dive into the pudding when he figured out how tasty it is. Nugget, of course, can always be counted on to coat himself from head to toe in any substance he gets his hands on.

Pigs in Mud Sensory Bin - tasty, messy fun for toddlers and preschoolers. Perfect for any farm themed tot school unit!

Fast Craft: Paper Plate Lambs

Make an adorable lamb out of a paper plate with this cute craft. Get the template at www.nuggetandgoose.com

Making paper plate lambs is easy, fun and the end results are surprisingly adorable! Best of all this is a craft that a preschooler can complete with minimal assistance from Mom. Elmer’s glue scrubs clean from just about every surface, right? *wink*.

This fun and easy diy paper plate craft is perfect for toddlers or preschoolers. Use it for your farm, easter or lamb themed tot school lesson!

Supplies:

  • 1 White Paper or Foam Disposable Plate
  • White Cotton Balls
  • One printed copy of the lamb template from my Digital Resource Library.
  • Elmer’s School Glue
  • 2 Googly Eyes
  • Scissors

Prep Work: Download my template and cut out  the legs, face and ears of the lamb.

**Don’t have an access code for the Digital Resource Library? No problem! Just sign up below and one will me emailed to you right away!

Instructions:

  1. Use Elmer’s Glue to apply the round head to the center of the plate, then glue all 4 legs to the edges.
  2. Glue the eyes on to the face (shocker, I know. Unless you have more of a Picasso-esque lamb in mind …)
  3. Let your child go wild gluing as many cotton balls as they would like to the plate.
  4. When finished tuck the ears into the cotton and glue in place.
  5. Admire your adorable lamb – and maybe give it a name.

Milking a Cow Imaginative Play

DIY Milking station brings the farm inside - perfect for any farm themed tot school or home school unit! Visit www.NuggetandGoose.com to learn more!

Ok, I’m going to level with you. This was a super neat activity that turned out far better than I initially imagined, however it might be difficult to replicate at home. I will show you what I did, and then offer my suggestions for how you could possible put your own spin on the activity using things you already have around the house.

To begin with you need a frame of some sort. We made our own out of this Discovery Kids Construction Fort (which we have used endlessly for fort building!) I think you could use just about anything with 4 legs, maybe even a kitchen chair?

Next, you need a rubber glove and some twine. Fill the glove with water and use the twine to secure it shut at the wrist opening. Then use your frame to suspend the glove so that it dangles in the opening. When your child is ready to begin ‘milking their cow’ use a safety pin to poke 3-4 holes in the tip of 1-2 fingers. The glove will tend to drip so please keep a bucket beneath your milking station.

Using a few items from around the house you can make this fun milking station for your next farm themed tot school lesson.

Like a real cow, we found that our glove gave us the best results when we used a push-pull motion. If you feel particularly ambitious you could even decorate your frame so that it looks like a real cow. If you do that you officially win the Mom-of-the-Year Award and I absolutely want you to send in pictures!

Delicious Haystack Snack Recipe

These peanut butter and pretzel haystacks are perfect for any farm themed tot school unit - or for a quick and easy snack! Visit www.nuggetandgoose.com to get the recipe!

Nugget and Goose worked up quite the appetite doing all of our farm activities today so I figured it would be a great opportunity to finish the day with a yummy farm-themed snack. These tasty haystack snacks are a sweet and easy treat!

These peanut butter and pretzel haystacks are perfect for any farm themed tot school unit - or for a quick and easy snack! Visit www.nuggetandgoose.com to get the recipe!

Ingredients:

  • 1/2 Cup Creamy Peanut Butter (or substitute your favorite nut-free butter if your household has allergies)
  • 2-3 Cups Pretzel Sticks, broken into small pieces
  • 1/4 Cup White Chocolate Chips

Optional Additions: Slivered Almonds, Nutella, Chopped Nuts, Mini Marshmallows, Caramel Chips, Heath Bar Crumbles.

This delicious Haystack recipe is a fast and easy to make snack or desert! Get the recipe at www.nuggetandgoose.com

Recipe:

  1. Microwave the peanut butter and chocolate chips on high for 1-2 minutes until melted and stir until fully combined.
  2. If you wish to add any of the optional toppings stir them in now.
  3. Stir Broken Pretzels into your melted peanut butter mixture and spoon dollops of it onto a baking sheet covered in a Silpat Mat or wax paper.
  4. Let cool in a refrigerator for about an hour.

There’s way too much sugar to call this snack healthy, but I think it’s just right as a special treat after working hard and learning all morning.

Did you try any of our farm-themed tot school activities?

Which did your kids like best? Are there any other farm-related activities you would like to see later this week?

Check back later this week to see Part II and Part III of our Farm Themed Tot School Unit!


Save

Save

Save

Two Fun Father’s Day Crafts

Show that special someone that they mean the world to you with this crafty DIY Earth card. Learn how at www.NuggetandGoose.com

Father’s Day is three days away. That means that if you don’t have your gifts yet it’s time to get your fanny in gear. Not to worry though, I’ve got a great card idea and a cool looking mug that will be perfect for Dad, Grandad, or any other special someone who deserves a little recognition. These two fun father’s day crafts should be just the thing to kick off Father’s Day – but if you need more you should check out my post on how to make a ‘Hot Wheels Back Massage Shirt’. Intrigued? You should check it out!

Show Dad that he means the world to you with this creative, crafty card! Learn how at www.NuggetandGoose.com

“You Mean the World to Me” Card

Dads are amazing aren’t they? Always ready to step in and kill that spider or open that pickle jar. What would we do without them? Show Dad that he means the world to you with this crafty card!

Show that special someone that they mean the world to you with this crafty DIY Earth card. Learn how at www.NuggetandGoose.com

Supplies:

  • Clear Contact Paper
  • Blue and Green Tissue Paper
  • Construction Paper in two colors (I used black and orange)
  • Scissors

Show Dad that he means the world to you with this creative, crafty card! Learn how at www.NuggetandGoose.com

Instructions:

  1. Use 2 plates or bowls (or stencils if you are so prepared) to trace 2 concentric circles on a sheet of construction paper, then trace the larger circle on a piece of contact paper.
  2. Cut out both circles, including the inner circle on the construction paper. You will have one large circle cut out of contact paper and a ring of construction paper.
  3. Peel the backing off of the contact paper and stick the construction paper ring to it. This will leave a sticky clear circle in the middle.
  4. Cut or tear small squares of tissues paper in both colors. This is a great chance for your preschooler to practice cutting with some safety scissors!
  5. Let your child stick the tissue paper squares to the contact paper to make their very own ‘earth’ design.
  6. Use your accent colored construction paper to trace your child’s hands and cut them out.
  7. Tape or glue the hands to the back of your world and use them to write your message to Dad. Here are a few ideas to get your started:
  • Dad, you’re out of this world!
  • You mean the world to us Daddy!
  • Pops, my world would be lost without you!

Show Dad that he means the world to you with this creative, crafty card! Learn how at www.NuggetandGoose.comShow Dad that he means the world to you with this creative, crafty card! Learn how at www.NuggetandGoose.com

Colorful Father’s Day Mug

This Sharpie mug is sure to make morning coffee special when it's decorated for someone you love! Learn how at www.nuggetandgoose.com

If you have kids, you probably rely on your morning coffee to survive. Unless you’re my hubby who has somehow managed to reach the ripe age of 40 without developing a caffeine addiction. I can’t decide if that’s admirable or just insane. Either way, this coffee mug craft can easily be adapted for your favorite friend or family member. It does require permanent markers though so it might be best to save for preschoolers and older children. Or even make one yourself – they’re easy and fun!

A few sharpies and a mug are all it takes to make this creative, crafty mug for father's day! See more at www.NuggetandGoose.com

Supplies:

  • One White Mug (I found mine at Walmart for $0.87!)
  • A set of letter stickers – the color doesn’t matter so feel free to use up some ugly ones that are laying around the house.
  • Assorted Sharpie Oil-Based Paint Markers
  • An Oven

This Sharpie mug is sure to make morning coffee special when it's decorated for someone you love! Learn how at www.nuggetandgoose.com

Instructions:

  1. Clean the mug thoroughly, wiping with rubbing alcohol if necessary to remove any oils and residue.
  2. Use stickers to spell out the name or message that you wish to show on the mug. In this case I spelled out ‘Grandaddy’.
  3. Let your child use the markers to decorate the mug, be sure to color over the letter stickers thoroughly.
  4. Once finished allow the mug to dry for 24 hours, then carefully remove your stickers. If they don’t want to peel right off, a shot of hot air from a hair dryer seems to do the trick.
  5. Set your mug on a cookie sheet and place in a COLD oven. Allow the oven to heat to 400 degrees with the mug inside so that it is gradually warmed. Then set timer to 30 minutes. After 30 minutes turn off the oven and let the mug cool inside. If you absolutely must remove it early, use oven mitts – it will be very hot!

Enjoy your mug! I have read that oil based sharpies will survive the dishwasher but I have chosen to hand wash mine with soap and water and it is holding up nicely. I believe this craft could easily translate to use on a plate or serving dish but I am not sure how food safe it would be. You should be fine with your markings on the outside of your mug though.

How did your mug turn out? Did the recipient just adore it? Tell me all about it and show me a picture in the comments!

Save

Fast Father’s Day DIY Gift

All it takes is a little iron-on transfer paper and this image to make a fun and easy Father's Day gift - perfect for the Dad who wants to nap when the kids would rather play!

Is it just me or is this year just flying by? I can’t believe that June is already halfway over – where has Summer gone? Father’s Day is right around the corner, and I have the perfect easy gift to make for Dad. This shirt is perfect for those lazy parenting days when you just can’t quite adult but the kids still want to play. Lucky for you all it takes is one quick Walmart Run and 15 at the ironing board and your Father’s Day gift will be good to go!

This is all you need to make a fun and easy Father's Day shirt for Dad!

Supplies:

  • 2 Sheets of Light Colored Iron-On Transfer Paper
  • 1 Light Colored T-Shirt
  • An Iron
  • A Hard Surface to Iron On (not an ironing board)
  • A Printer – or a helpful friend who will let you use theirs!

Print this image on iron-on transfer paper to create a cool shirt for Dad for Father's Day!

This easy Father's Day DIY Gift is perfect of Dads of Boys who love their toy vehicles, it features a cool road design perfect for driving - and giving Dad a back massage!

How To Make Your Father’s Day Shirt:

  1. Visit my Digital Resource Library to download the iron-on template. Don’t have an access code? Just sign up below and one will be sent to you – it’s totally free!
  2. Print the image on your iron-on transfer paper. Note: this image is sized at 11″x17″ and is designed to be printed across 2 horizontal sheets of 8.5×11 paper. Depending on your printer’s settings you may need to do a test run before you waste your iron-on transfer paper.
  3. Follow the instructions that came with your iron-on transfer paper to apply the image to the back of your shirt. I used Avery brand paper and was instructed to use firm pressure with a hot iron on a hard surface (I used a wooden cutting board).
  4. Wrap your awesome gift and pat yourself on the back. You have officially made a gift that Dad and kids will both enjoy!

Edit: A few readers have mentioned having issues getting the images to print properly. If your printer is having issues with formatting, I recommend visiting the Acrobat print dialogue to select Page Scaling, Tile Large Pages (or Tile All Pages). Set Tile Scale to 89% and overlap to 0″.

Make Father's Day Fun with this easy DIY Father's Day Shirt Printable!

Happy Father’s Day!

I hope the Dad in your life enjoys this gift – and that whoever ends up wearing it gets what I am sure is a much deserved break. (And maybe a Hot Wheels induced back massage??!)

Do you guys have any other exciting plans to make Father’s Day special? Let me know in the comments!

Save

Save

Save

Save

Ocean Themed Tot School Unit: Part 3

This is the final part of my Ocean Themed Tot School Unit - which is chock full of fun games, educational activities and free printables. Visit www.NuggetandGoose.com to see the whole series!

All good things must come to an end, and so too must my Ocean themed Tot School unit. I have had so much fun with my boys as we learned about aquatic life, and tried out some fantastic games and crafts. Today I’m going to show you the rest of what we tried out, and give you my final verdict on what to try (and what to stay away from!).

Underwater Chalk Art

Try this easy Under Water Chalk Art project for a fun tactile twist on drawing. See how at www.NuggetandGoose.com

This was a really unique activity that turned out to be a lot of fun – even for Mommy! The supplies are minimal and the results are striking. Best of all – this is a activity that covers a wide range of ages so everyone can participate together.

Supplies:

  • Dark Colored Construction Paper
  • Chalk
  • Sponges
  • A Shallow Dish of Water

How To:

Use your dish of water to wet the sponge and apply it to both sides of your construction paper. Let it get good and wet! Then use the chalk to draw on the wet paper. As the paper dries your chalk art will become bright and vivid. See? I told you it was crazy easy!

For the littlest tots the sensory experience of handling a sponge and wet paper will be fun enough. This is a very tactile art project that can create some really fun looking art.

Animal Activity Cards

Visit www.NuggetandGoose.com to get your copy of my FREE Ocean Animal Activity Cards!

I designed this free printable to encourage kids to get up and get moving. Each card features a cute ocean creature and an action for your child to perform. They can ‘Wiggle like a jellyfish’ or ‘Squawk like a Seagull’. It didn’t take long for this to turn into a game of ‘who can be sillier?’ at our house. After sitting still for an art project it’s great to get moving, so this was a perfect follow-up to our underwater chalk art.To download yours just sign up below and you’ll be sent an access code for my Free Digital Resource Library!

Colored Rice Sensory Bin

As I mentioned in Part I, Safari Limited Ocean Toobs played a huge part in our Ocean themed tot school unit. They worked very well in our water bead bin,  but they’re also perfect in a dish of blue colored rice. Rice is always a safe bet if you feel that your little ones aren’t quite ready to be trusted with water beads.

Blue Colored Rice Ocean Sensory Bin

If you haven’t made colored rice you can see how we do it here.

Our Favorite Ocean Themed Books

I LOVE to read, and I try my hardest to instill that love in my boys. I think the most important thing is to read as often as possible, so I always go out of my way to find books that go with our tot school themes. Here are a few of the books we enjoyed the most:

These toys and books are perfect for fostering learning and worked out so well within our ocean themed tot school unit. See how we used them at www.nuggetandgoose.com

DK Eyewitness Books: Ocean – I adore the DK Eyewitness Series. The books offer great graphics along with a wide array of facts. Even if the books don’t hold your child’s attention, the eye-popping images should.

Commotion in the Ocean by Giles Andreae – This is a fun book for all ages. It features brightly colored illustrations accompanied by short poems. Each poem highlights a different ocean creature in a light and informative way.

Clark the Shark by Bruce Hale – Clark the Shark has a whole series of books now, but this is the original. It tells the tale of poor Clark who is just too big and rough for his smaller classmates. I think it’s definitely a must if you have boys, to help them learn to be considerate and not play too rough.

The Pout-Pout Fish by Deborah Diesen – One of my favorite children’s books, the Pout-Pout Fish is just fun to read. Who doesn’t love the face you make as you chant “Blub …. Blub …. Blub”? The prose has a great cadence and the end has a nice twist. Overall this is a book you will come back to time and again.

The Rainbow Fish by Marcus Pfister – This book is another classic, and if you haven’t read it you probably have at least seen it on a bookshelf before. It tells the tale of Rainbow Fish who learns the joys of sharing his beautiful shiny scales. The message of generosity is fantastic for children and the artwork is beautiful. It would be impossible to have an ocean unit without Rainbow Fish.

Wrap-Up

Our ocean unit was a ton of fun! I feel like my boys learned a lot and I will definitely pull out some of these activities again as Nugget gets older and is ready to participate more. The biggest hit was the ice-cavating activity and the least successful was the jellyfish bottle.

Which activities did you try?

Comment below with your own hits and misses, and let me know if there is a tot school theme you would like to see soon.

Save

Save

Easy Ocean Themed Tot School Unit: Part 2

Find everything you need for a fantastic ocean themed tot school unit including adorable free printables at www.NuggetandGoose.com

Welcome back! I’m super excited to share with you more of our ocean themed tot school unit. If you missed the first part of this unit just click here.

Ocean Ice-Cavating

Cool off this summer with a fun and educational ocean ice-cavating activity! Learn how at www.NuggetandGoose.com!

This activity takes a little foresight to prepare but is still super easy and my boys just LOVED it! I used small plastic storage containers and froze an assortment of seashells and ocean figurines within several layers of colored ice. If you’re short on time I think most kids would be just as happy with a single color block of ice, but the rainbow definitely adds a little something extra.

Cool Fun Ocean Creature Ice-Cavating Activity - Perfect for hot summer days! Learn how at www.NuggetandGoose.com Fun Ocean Creature Ice-Cavating Activity - Perfect for hot summer days! Learn how at www.NuggetandGoose.com

Once your ice block is frozen your work is done and it’s time to let the kiddos get to it. I provided a bowl of warm water and an assortment of sponge brushes, spray bottles and droppers for applying it to the ice. I also gave the boys several toy hammers, saws and screwdrivers. They aren’t very effective but it didn’t stop Nugget and Goose from trying.

This is definitely a messy activity so I recommend saving it for a hot day outside.

Fun Ocean Creature Ice-Cavating Activity - Perfect for hot summer days! Learn how at www.NuggetandGoose.com

Jellyfish Discovery Bottle

Create a Jellyfish in a Jar Sensory Bottle for your next ocean or beach themed tot school unit. Learn how at www.NuggetandGoose.com

This was one of those activities that I wasn’t too impressed by, but my boys have loved. We made our little jellyfish out of an old plastic grocery bag and a Voss water bottle. My biggest complaint is that he moves too quickly and tends to hide at the top of the bottle. I have experimented with adding corn syrup to the water (Spoiler Alert: DON’T Try That!) and it had a very slimy reaction with the plastic bag and quickly started growing something disgusting. Perhaps the bags from your grocery store are cleaner but I learned that mine are a petri dish of germs just waiting to grow. Ick!

To Make your own jellyfish bottle you will need:

  • water bottle
  • light colored plastic grocery bag
  • Fine white thread or clear elastic
  • Small syringe or dropper (I used one that was leftover from a bottle of infant Tylennol)
  • Food Coloring (optional)
  1. Begin by laying out your grocery bag and carefully cutting away the sides and bottom until you have a large square.
  2. Gather the center of the plastic and stuff with some scraps before fastening with string or elastic. You want to trap a little air in here but also leave room to add a drop or two of water with the syringe.
  3. Carefully cut the remaining bundle into strips for tentacles, leaving them attached to the body. If you leave too much it will turn into a tangled mess in the water, but you can always pull it out and perform surgery on your little guy if necessary.
  4. Once you have your jellyfish complete, place him in your bottle and fill it to the brim with water. If you are adding food coloring now is the time to do so.
  5. Screw on the lid and give your jellyfish a good shake. Hopefully he (or she!) will gracefully glide from one end of the bottle to the other.

Create a Jellyfish in a Jar Sensory Bottle for your next ocean or beach themed tot school unit. Learn how at www.NuggetandGoose.com

How did your jellyfish turn out? Did he have the same swimming issues that ours did? Tell me all about it in the comments, and if you find a way to slow down his swim please share! 🙂

Size Sorting Printable

This adorable size sorting printable is perfect for any ocean or beach themed tot school unit and available free at www.NuggetandGoose.com

This printable turned out to be one of my favorites, because there are so many ways to modify it. The download includes a basic large vs. small version as well as a large vs. medium vs. small page. Once you have printed out the sorting background, print the page full of ocean creatures and cut them out. As always I laminated mine so it would withstand multiple uses. After finding tiny creature cut-outs all over the house I went back and added clear velcro dots to the back of each creature and the background page so that they stay with the activity.

Awesome Seashell Size Sorting Free Printable from nuggetandgoose.com

This sorting page also works great for sorting seashells, or even stickers if you find a variety of sizes. What did your kids prefer to sort?

Some of Our Favorite Ocean Themed Toys

These toys and books are perfect for fostering learning and worked out so well within our ocean themed tot school unit. See how we used them at www.nuggetandgoose.com

One of the best things about these learning units is the opportunity to scavenge your house to find materials. Sure, you can make some activities, but you’ll be surprised how much you already have to work with. Here are a few of our favorite toys and games.

Color Fun Fish Bowl – I’m not a fan of electronic toys. As a general rule I prefer a toy that uses imagination instead of batteries but this thing rocks! Nugget spends 20 – 30 minutes playing with it, and at 18 months old NOTHING holds his attention for that long. My favorite part is that it has 2 play modes. The first simply tells you the color of the fish that is inserted into the bowl (GREAT fine motor practice!). The second mode asks for a certain color and the child has to find it and insert it. Even though Goose has known his colors for quite a while he still has fun with this toy, so it definitely gets points for versatility!

Melissa & Doug Sea Life Wooden Chunky Puzzle (7 pcs) – what I like about this puzzle in particular is the chunky pieces that don’t have tabs or handles. This allows them to be used in imaginative play beyond the puzzle. There is also <this> magnetic version which is great for older kids as they use a fishing pole to lift the puzzle pieces.


Baby Einstein: Animal Discovery Cards – These cards are made of sturdy, heavy-weight paper and feature a glossy photo of an animal on one side and fun facts on the other. We have used ours over and over as a vocabulary building tool, in sorting games, and more. There are even questions and tips on each card to help encourage critical thinking!


Safari Ltd Ocean TOOB – I am crazy about Safari Limited Toobs. I don’t think I’ve ever done a tot school unit without including at least one toob. They bring a fantastic hands-on quality to vocabulary lessons and can be used as a manipulative or toy. For our unit I used the Ocean Toob, Coral Reef Toob, and the Dolphins and Whales Toob. The Deep Sea Creatures Toob wasn’t available near me but if I had known about it I probably would have gotten it too!  (I think I may have a problem …. is anyone interested in forming a Toob support group? :))

Sign up below to get access to my exclusive Digital Resource Library where you can download all of the printables from this post and MUCH MORE!

Save

Save

Easy Ocean Themed Tot School Unit: Part 1

This easy ocean themed tot school unit includes tons of free printables, sensory play, fine motor activities and games. Help your kids have fun this summer as they learn all about ocean life at www.NuggetandGoose.com!

This Ocean Themed Tot School Unit includes a fun water bead sensory bin, free printable lacing cards, beach themed nomenclature cards for baby and more free printables! perfect for any summer, beach, or ocean themed tot school unit! Visit www.NuggetandGoose.com to learn more!
Summer is a great time to take a vacation to the beach, but if it’s too far away you can bring the beach inside with this fun ocean themed tot school unit! I have created so many printables and activities that I had to divide it into three posts! So check back throughout the week as I continue to share all the ocean themed fun we have been having!

Baby Nomenclature Cards


These balsa wood nomenclature cards are an easy way to build vocabulary for your littlest tot, perfect for early tot school. Learn how I made them by visiting www.NuggetandGoose.com

As a Montessori Mama I am a HUGE fan of nomenclature cards. What are nomenclature cards, you ask? Simple, they are cards that feature a vocabulary word and image (think flashcards for vocabulary building). In the Montessori tradition they are frequently used as ‘Three-Part Cards’. There is a complete card with both the image and title, as well as a second divided card with an image on one portion and the title on a separate portion. It really isn’t as confusing as it sounds 🙂

As children begin to read they can use 3-part cards to match the title to the image. For now, my boys just use nomenclature cards which allow them to build vocabulary. (If you’re interested in learning more, click here) For months Nugget has been trying desperately to get his hands on Goose’s laminated nomenclature cards for each unit I introduce. Unfortunately his little motor skills just aren’t quite ready to handle the laminated cards without bending (and often chewing!) them to pieces.

This is why I decided it was time to find a way to create his own set of nomenclature cards that would be virtually indestructible.

Easy Balsa Wood Nomenclature Cards are Almost Indestructible! Perfect for an ocean or beach themed tot school unit.

How To:

  • First, gather your supplies. You will need
    • Mod Podge
    • Acrylic Paint (I used white)
    • A set of Images for your cards – download mine here
    • Thin pieces of Balsa Wood
  • Begin by printing and cutting out your nomenclature card images.
  • Using your paper images as a guide, mark how large you wish for your wooden pieces to be. Mine are 2.5″ x 3.75″.
  • Cut your wood strips into the desired size and thoroughly sand the edges. You don’t want to leave any splinters that could find their way into tiny fingers!
  • Use your acrylic paint to apply a background color to both sides of your wood card.
  • Once the paint has dried fully use Mod Podge to adhere your paper nomenclature cards. I applied 6 coats to the front and 2 coats to the back of my cards to ensure a smooth, shiny finish.

Nugget was so excited when I introduced his very own nomenclature cards! He’s at the age where he wants to do everything that big brother does. First we sat together and went through each card as I read the titles to him. Then, I brought out a basket containing Munchkin Ocean Squirts bath toys. He quickly figured out how to lay out the cards and match the bath toy to the corresponding card. It was so much fun! When he proudly said “Sark!” it just warmed my heart!

Lacing Cards

Free printable download - ocean themed tot school lacing cards featuring a fish and submarine. Get these and more at www.NuggetandGoose.com!

Lacing cards are such a fun way to develop fine motor skills, so I knew I just had to include them in my Ocean themed tot school unit! All you have to do is print, cut them out (this can be great cutting practice for an older sibling – and can save you time, too!), and punch the holes.

Personally, I prefer to laminate my cards so they last through more than one use. If you are looking for a laminator this Purple Cows Hot and Cold Laminator is very affordable and has worked perfectly for more than a year.

Some easy extension activities can include asking your child to lace every other hole, or even do a blanket stitch. There’s no reason that a material you took the time to make has to be used only one way.

Water Bead Sensory Bin

Water beads are the perfect medium for ocean themed sensory play! Learn more at www.NuggetandGoose.com

If you visit my blog very often you already know how much I adore water beads. The slimy, squishy texture is shockingly addicting and my little ones are over the moon excited when I get them out. I ordered these from Amazon and the tiny package has lasted several months. The beads expand to nearly 200 times their original size, so it doesn’t take many to fill a sensory bin. I usually prepare them the night before – pour a tablespoon or two in a bin full of water and by morning they are ready for play!

Note: Always supervise the use of water beads in your home. Although they are non-toxic they can still be hazardous if swallowed due to their exponential growth. Always store your water beads away from children and pets, and contact your doctor or vet if you believe they may have been ingested.

Free Printables!

These FREE Ocean Themed Tot School Printables include lacing cards, whale anatomy, pre-writing practice, size sorting, ocean zones and so much more! Visit www.Nuggetandgoose.com to get yours!

OK, you’ve been patient – and you will be so well rewarded. I got completely carried away designing printables for my Ocean themed tot school unit. There are the lacing cards I showed you above, size sorting games, animal activity cards, even a pretty ocean quote to decorate your tot school space! To get all this and more sign up below and you’ll receive your exclusive access code for my Digital Resource Library!

Check back Wednesday to see more of our Ocean Tot School Activities!

Save

Save

Save

Save

Save

Save

Save

Save

Save

Save

Save

How to Make Colored Rice (and What to Do With It!)

Colored Rice: The Basics

Colored rice is incredibly easy to make and extremely fun to work with. The color combinations are endless as are the applications. Below is my favorite recipe for how to make your own colored rice, followed by a few easy activities you can use it with.

Ingredients:

  • 1 Cup Uncooked Dry Rice
  • 1/8th Cup White Vinegar
  • Food Coloring

How to make colored rice for sensory play, and a few easy activities to try when you're done! Learn more at www.NuggetandGoose.com

Instructions:

Begin by pouring the vinegar over your dry rice. Ad 3-5 drops of food coloring in your desired color(s) and stir until well combined. The more food coloring you use, the darker and more vivid your rice will be.

Once the rice is fully combined spread it evenly over a baking sheet. Let sit for 1-2 hours until completely dry, stirring occasionally. Store in a dry, sealed container when not in use.

OK, I’ve Made My Rice – Now What??

Colored Rice is perfect for sensory bins. It works particularly well for smaller children because it doesn’t post a chocking hazard and is non-toxic. Below you can see that I used it in an Ocean sensory bin and a Farm themed sensory bin.

Blue Colored Rice Ocean Sensory BinGreen Colored Rice Farm Themed Sensory Bin

This material also works well in several Montessori activities. I have used it as an introductory pouring medium, as well as for scooping.

Green Colored Rice Montessori Scooping ActivityRed Colored Rice Montessori Pouring Activity

Comment below with your favorite colored rice activity!

Save

Save

Save

Save

Save

Save